> ## Documentation Index
> Fetch the complete documentation index at: https://ultrarag.openbmb.cn/llms.txt
> Use this file to discover all available pages before exploring further.
# WebNote
我们为该 Demo 录制了一期讲解视频:[📺 bilibili](https://www.bilibili.com/video/BV1p8JfziEwM/?spm_id_from=333.337.search-card.all.click)。
## 什么是DeepResearch
Deep Research(也称为 Agentic Deep Research)是指大语言模型(LLM)协同工具(如搜索、浏览器、代码执行、记忆存储等),以“多轮推理→检索→验证→融合”的闭环方式,完成复杂任务的研究型智能代理。
不同于单次检索的 RAG(Retrieval-Augmented Generation),Deep Research 更像人的专家思路——先制定计划,再不断探索、调整方向、核实信息,最终输出结构完整、有出处的报告。
## 前置准备
在本次开发中,我们将基于 UltraRAG 框架 完成示例。考虑到大多数小伙伴可能没有算力服务器,我们全程在一台 MacBook Air (M2) 上实现,确保环境轻量、易于复现。
### API准备
* 检索 API:我们采用 [Tavily Web Search](https://www.tavily.com/),初次注册即可免费获得 1000 次调用额度。
* LLM API:你可以根据自己的习惯选择任意大模型服务。本教程中,我们使用 gpt-5-nano 作为示例
### API设置
我们提供了两种方式传入 API Key:环境变量和显式参数。其中推荐使用 环境变量,更安全,也能避免 API Key 在日志中泄漏。
在 UltraRAG 根目录下,将模板文件 `.env.dev` 重命名为 `.env`,
并填写你的密钥信息,例如:
```
LLM_API_KEY="your llm key"
TAVILY_API_KEY="your retriever key"
```
UltraRAG 会在启动时自动读取该文件并加载相关配置。
## Pipeline介绍
在本示例中,我们将实现一个轻量级的 Deep Research Pipeline。它具备以下基本功能:
* Plan 制定:模型先根据用户问题制定解决方案的计划;
* 子问题生成与检索:将大问题分解为可检索的子问题,并调用 Web 搜索工具获取相关资料;
* 报告整理与填充:逐步完善研究报告的内容;
* 推理与最终生成:在报告完成后,模型给出最终答案。
流程图如下所示:
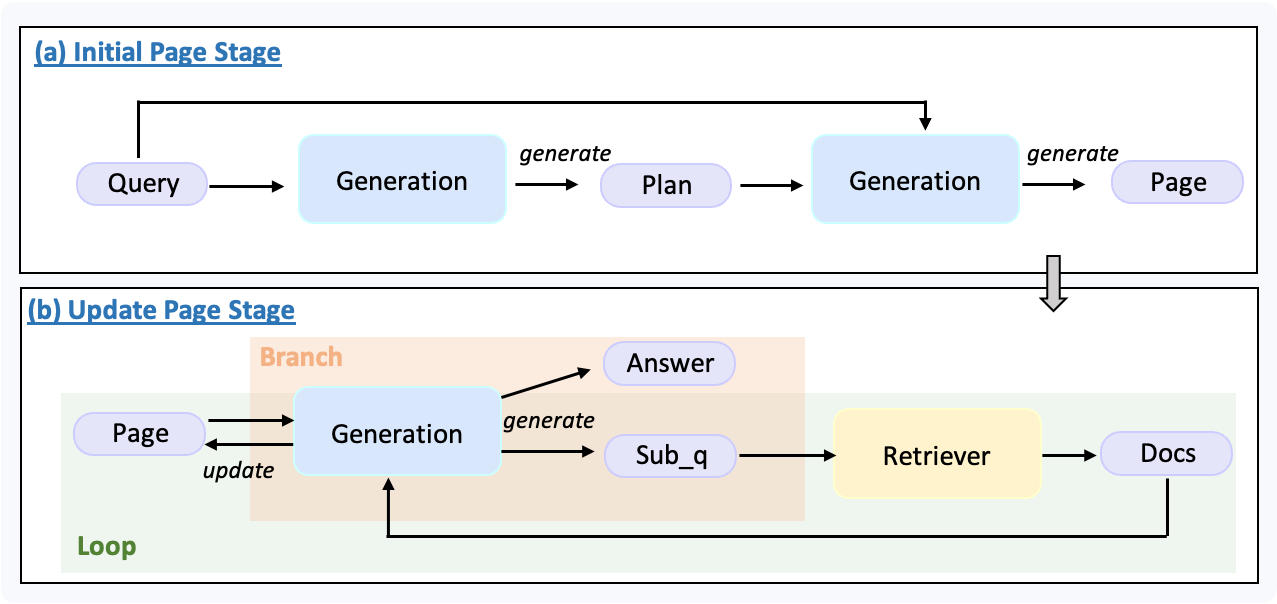 该 pipeline 主要分为两个阶段:
1. **初始化阶段:** 模型会根据用户问题生成一份 plan,并据此构造出初始的报告 page。
2. **迭代填充阶段:**
* 系统会检查当前报告 page 是否已填充完整。
* 判断标准为:page 中是否仍存在 "to be filled" 字符串。
* 如果报告尚未完成,模型会结合用户问题、plan 与当前 page,生成一个新的子问题并触发 Web 检索。
* 检索到的文档会被用于更新 page,然后进入下一轮检查。
* 这个过程会持续迭代,直到 page 被填满。
最后,模型会基于用户问题与最终报告 page,生成完整的答案。
这个示例的代码实现非常简洁,主要依赖 router 与 prompt tool 的自定义扩展。感兴趣的小伙伴可以直接查看源码。以下是完整的 pipeline 定义:
```yaml examples/webnote_websearch.yaml icon="https://mintcdn.com/ultrarag/T7GffHzZitf6TThi/images/yaml.svg?fit=max&auto=format&n=T7GffHzZitf6TThi&q=85&s=69b41e79144bc908039c2ee3abbb1c3b" theme={null}
# MCP Server
servers:
benchmark: servers/benchmark
generation: servers/generation
retriever: servers/retriever
prompt: servers/prompt
router: servers/router
# MCP Client Pipeline
pipeline:
- benchmark.get_data
- generation.generation_init
- prompt.webnote_gen_plan
- generation.generate:
output:
ans_ls: plan_ls
- prompt.webnote_init_page
- generation.generate:
output:
ans_ls: page_ls
- loop:
times: 10
steps:
- branch:
router:
- router.webnote_check_page
branches:
incomplete:
- prompt.webnote_gen_subq
- generation.generate:
output:
ans_ls: subq_ls
- retriever.retriever_tavily_search:
input:
query_list: subq_ls
output:
ret_psg: psg_ls
- prompt.webnote_fill_page
- generation.generate:
output:
ans_ls: page_ls
complete: []
- prompt.webnote_gen_answer
- generation.generate
```
## 运行
### 构建问题数据
首先,在 data 文件夹下新建一个名为 sample\_light\_ds.jsonl 的文件,并写入你要研究的问题。例如:
```json data/sample_light_ds.jsonl icon="https://mintcdn.com/ultrarag/T7GffHzZitf6TThi/images/json.svg?fit=max&auto=format&n=T7GffHzZitf6TThi&q=85&s=81a8c440100333f3454ca984a5b0fe5a" theme={null}
{"id": 0, "question": "介绍一下提瓦特大陆", "golden_answers": [], "meta_data": {}}
```
### 构建参数配置文件
执行以下命令生成 pipeline 对应的参数文件:
```shell theme={null}
ultrarag build examples/webnote_websearch.yaml
```
根据实际情况对参数进行修改,例如:
```yaml examples/parameter/webnote_websearch_parameter.yaml icon="https://mintcdn.com/ultrarag/T7GffHzZitf6TThi/images/yaml.svg?fit=max&auto=format&n=T7GffHzZitf6TThi&q=85&s=69b41e79144bc908039c2ee3abbb1c3b" theme={null}
benchmark:
benchmark:
key_map:
gt_ls: golden_answers
q_ls: question
limit: -1
name: nq # [!code --]
path: data/sample_nq_10.jsonl # [!code --]
name: ds # [!code ++]
path: data/sample_light_ds.jsonl # [!code ++]
seed: 42
shuffle: false
generation:
backend: vllm # [!code --]
backend: openai # [!code ++]
backend_configs:
hf:
batch_size: 8
gpu_ids: 2,3
model_name_or_path: openbmb/MiniCPM4-8B
trust_remote_code: true
openai:
api_key: abc
base_delay: 1.0
base_url: http://localhost:8000/v1 # [!code --]
base_url: https://api.openai.com/v1 # [!code ++]
concurrency: 8
model_name: MiniCPM4-8B # [!code --]
model_name: gpt-5-nano # [!code ++]
retries: 3
vllm:
dtype: auto
gpu_ids: 2,3
gpu_memory_utilization: 0.9
model_name_or_path: openbmb/MiniCPM4-8B
trust_remote_code: true
extra_params:
chat_template_kwargs:
enable_thinking: false
sampling_params:
max_tokens: 2048
temperature: 0.7
top_p: 0.8 # [!code --]
system_prompt: ''
prompt:
webnote_fill_page_template: prompt/webnote_fill_page.jinja
webnote_gen_answer_template: prompt/webnote_gen_answer.jinja
webnote_gen_plan_template: prompt/webnote_gen_plan.jinja
webnote_gen_subq_template: prompt/webnote_gen_subq.jinja
webnote_init_page_template: prompt/webnote_init_page.jinja
retriever:
retrieve_thread_num: 1
top_k: 5
```
### 启动
在运行前,不要忘记设置你的 API Key:
```shell theme={null}
ultrarag examples/webnote_websearch.yaml
```
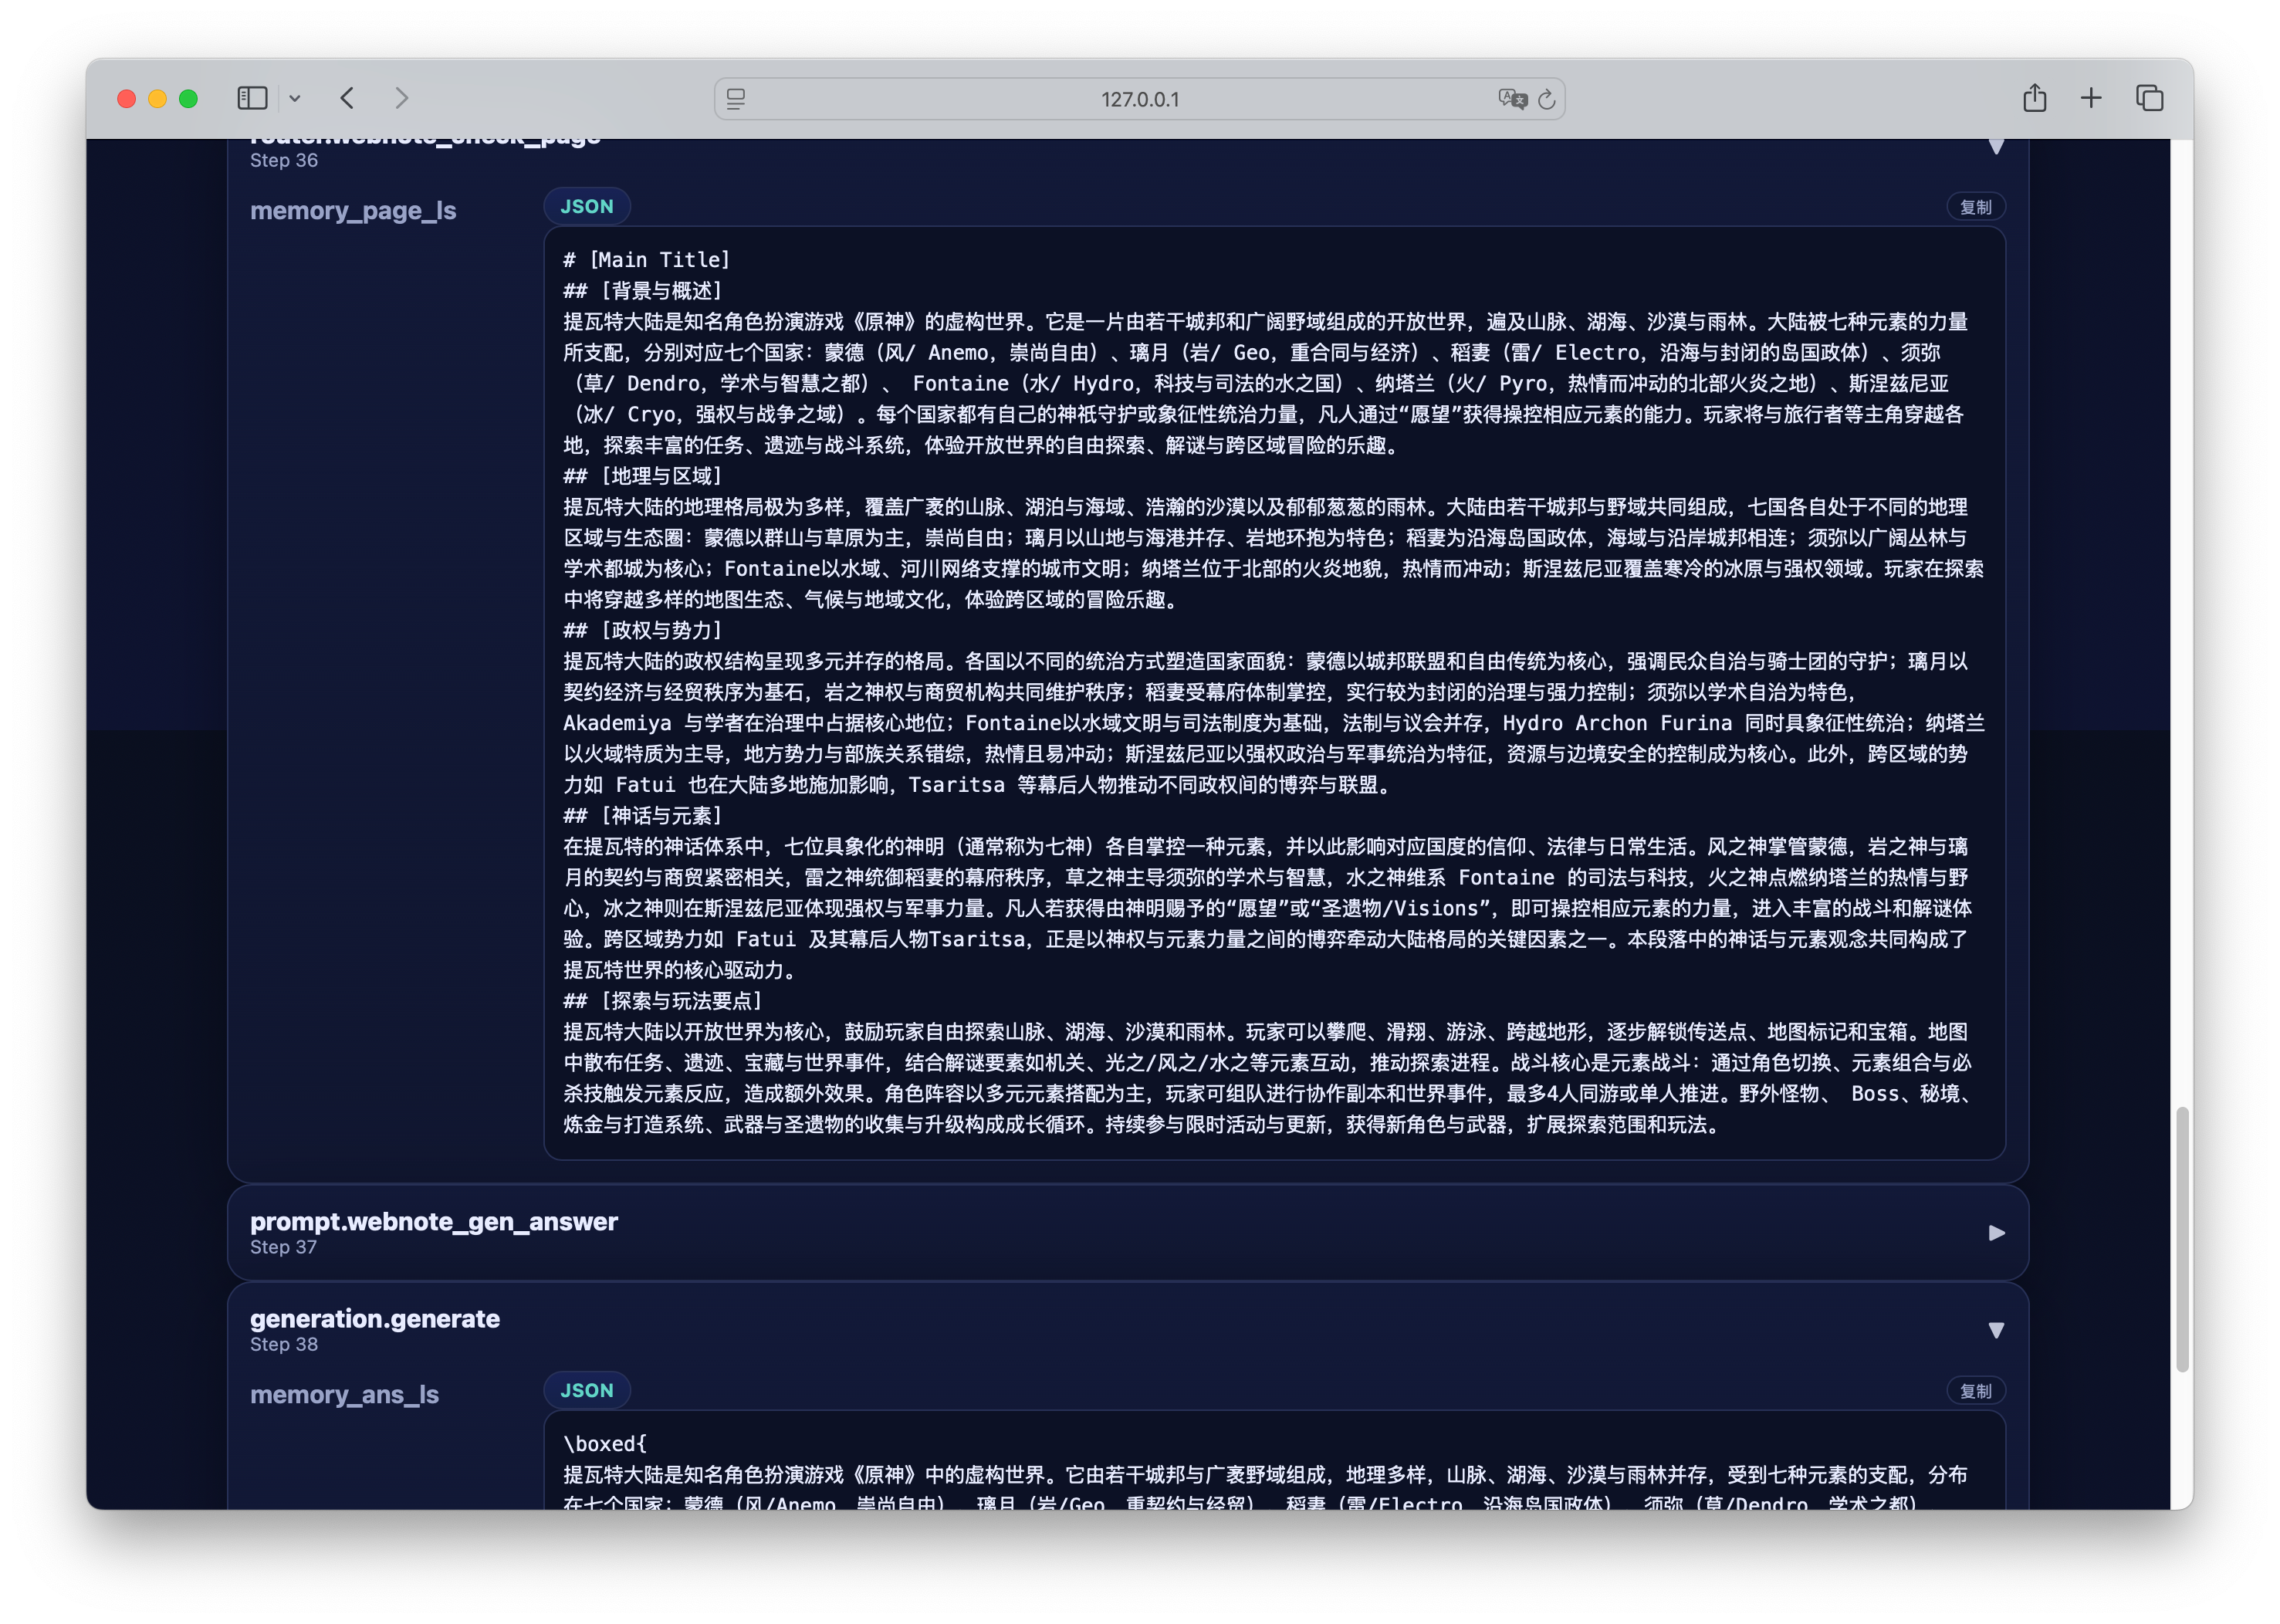
运行完成后,你可以通过 Case Study Viewer 可视化地查看生成内容:
```shell theme={null}
python ./script/case_study.py \
--data output/memory_ds_light_deepresearch_20250909_152727.json \
--host 127.0.0.1 \
--port 8070 \
--title "Case Study Viewer"
```
这样即可在浏览器中打开结果页面,直观地分析 pipeline 的执行过程与生成内容。
该 pipeline 主要分为两个阶段:
1. **初始化阶段:** 模型会根据用户问题生成一份 plan,并据此构造出初始的报告 page。
2. **迭代填充阶段:**
* 系统会检查当前报告 page 是否已填充完整。
* 判断标准为:page 中是否仍存在 "to be filled" 字符串。
* 如果报告尚未完成,模型会结合用户问题、plan 与当前 page,生成一个新的子问题并触发 Web 检索。
* 检索到的文档会被用于更新 page,然后进入下一轮检查。
* 这个过程会持续迭代,直到 page 被填满。
最后,模型会基于用户问题与最终报告 page,生成完整的答案。
这个示例的代码实现非常简洁,主要依赖 router 与 prompt tool 的自定义扩展。感兴趣的小伙伴可以直接查看源码。以下是完整的 pipeline 定义:
```yaml examples/webnote_websearch.yaml icon="https://mintcdn.com/ultrarag/T7GffHzZitf6TThi/images/yaml.svg?fit=max&auto=format&n=T7GffHzZitf6TThi&q=85&s=69b41e79144bc908039c2ee3abbb1c3b" theme={null}
# MCP Server
servers:
benchmark: servers/benchmark
generation: servers/generation
retriever: servers/retriever
prompt: servers/prompt
router: servers/router
# MCP Client Pipeline
pipeline:
- benchmark.get_data
- generation.generation_init
- prompt.webnote_gen_plan
- generation.generate:
output:
ans_ls: plan_ls
- prompt.webnote_init_page
- generation.generate:
output:
ans_ls: page_ls
- loop:
times: 10
steps:
- branch:
router:
- router.webnote_check_page
branches:
incomplete:
- prompt.webnote_gen_subq
- generation.generate:
output:
ans_ls: subq_ls
- retriever.retriever_tavily_search:
input:
query_list: subq_ls
output:
ret_psg: psg_ls
- prompt.webnote_fill_page
- generation.generate:
output:
ans_ls: page_ls
complete: []
- prompt.webnote_gen_answer
- generation.generate
```
## 运行
### 构建问题数据
首先,在 data 文件夹下新建一个名为 sample\_light\_ds.jsonl 的文件,并写入你要研究的问题。例如:
```json data/sample_light_ds.jsonl icon="https://mintcdn.com/ultrarag/T7GffHzZitf6TThi/images/json.svg?fit=max&auto=format&n=T7GffHzZitf6TThi&q=85&s=81a8c440100333f3454ca984a5b0fe5a" theme={null}
{"id": 0, "question": "介绍一下提瓦特大陆", "golden_answers": [], "meta_data": {}}
```
### 构建参数配置文件
执行以下命令生成 pipeline 对应的参数文件:
```shell theme={null}
ultrarag build examples/webnote_websearch.yaml
```
根据实际情况对参数进行修改,例如:
```yaml examples/parameter/webnote_websearch_parameter.yaml icon="https://mintcdn.com/ultrarag/T7GffHzZitf6TThi/images/yaml.svg?fit=max&auto=format&n=T7GffHzZitf6TThi&q=85&s=69b41e79144bc908039c2ee3abbb1c3b" theme={null}
benchmark:
benchmark:
key_map:
gt_ls: golden_answers
q_ls: question
limit: -1
name: nq # [!code --]
path: data/sample_nq_10.jsonl # [!code --]
name: ds # [!code ++]
path: data/sample_light_ds.jsonl # [!code ++]
seed: 42
shuffle: false
generation:
backend: vllm # [!code --]
backend: openai # [!code ++]
backend_configs:
hf:
batch_size: 8
gpu_ids: 2,3
model_name_or_path: openbmb/MiniCPM4-8B
trust_remote_code: true
openai:
api_key: abc
base_delay: 1.0
base_url: http://localhost:8000/v1 # [!code --]
base_url: https://api.openai.com/v1 # [!code ++]
concurrency: 8
model_name: MiniCPM4-8B # [!code --]
model_name: gpt-5-nano # [!code ++]
retries: 3
vllm:
dtype: auto
gpu_ids: 2,3
gpu_memory_utilization: 0.9
model_name_or_path: openbmb/MiniCPM4-8B
trust_remote_code: true
extra_params:
chat_template_kwargs:
enable_thinking: false
sampling_params:
max_tokens: 2048
temperature: 0.7
top_p: 0.8 # [!code --]
system_prompt: ''
prompt:
webnote_fill_page_template: prompt/webnote_fill_page.jinja
webnote_gen_answer_template: prompt/webnote_gen_answer.jinja
webnote_gen_plan_template: prompt/webnote_gen_plan.jinja
webnote_gen_subq_template: prompt/webnote_gen_subq.jinja
webnote_init_page_template: prompt/webnote_init_page.jinja
retriever:
retrieve_thread_num: 1
top_k: 5
```
### 启动
在运行前,不要忘记设置你的 API Key:
```shell theme={null}
ultrarag examples/webnote_websearch.yaml
```
运行完成后,你可以通过 Case Study Viewer 可视化地查看生成内容:
```shell theme={null}
python ./script/case_study.py \
--data output/memory_ds_light_deepresearch_20250909_152727.json \
--host 127.0.0.1 \
--port 8070 \
--title "Case Study Viewer"
```
这样即可在浏览器中打开结果页面,直观地分析 pipeline 的执行过程与生成内容。